---
title: Create a Sublocation/Section Template
description: Build a sublocation and section template in Otuvy QM to break large service locations into floors and rooms, then assign it to your locations.
---
[Skip to content](https://help.otuvy.com/kb/create-a-sublocation-section-template#main-content)
[More support](https://help.otuvy.com/kb/kb-tickets/new?hsLang=en)

Open main navigation
Close main navigation
- [More support](https://help.otuvy.com/kb/kb-tickets/new)
- [Contact us](mailto:vip@otuvy.com)
[Contact us](mailto:vip@otuvy.com)
How can we help you?
- There are no suggestions because the search field is empty.
1. [Otuvy Knowledge Base](https://help.otuvy.com/kb?hsLang=en)
2. [Otuvy QM - Inspections](https://help.otuvy.com/kb/otuvy-qm-inspections?hsLang=en)
# Create a Sublocation/Section Template
# Create a Sublocation/Section Template
## Video Transcript
**Sublocation Templates** are used to map out and divide a location into segments. They help you break up a location, so your job templates don’t have to be long and detailed. Most commonly, **Sublocations** are floors and **sections** are rooms on each floor.
In our example, we clean a local library that has two stories. On the first story of the building, there are different sections to clean and maintain, such as a reception or checkout desk, bathrooms, and a reading area. The second story of the library has study rooms and a computer area. Now that we understand the layout of our building, we’ll build our template.
To create a **Sublocation Template**, we first click on the **Admin tab** on the navigation bar. From here, we’ll click **Sublocation Templates** in the **Other** section at the bottom of the page. On the **Sublocation Template** search page, click **New Sublocation Template** to the right above the list. First, we’ll name the template. Most sublocation templates won’t be assigned to multiple buildings since they are specific to locations, so we’ll name it after the service location.
Below, we have boxes where we add our sublocations and sections. It can be confusing the first time, but always remember that if you have sections in your sublocations, those should be added before you add the sublocation.
To begin, we’ll type in the first **sublocation**, Floor 1. Don’t click the **Add** button yet! If you do, we can’t add sections to this sublocation. Now we go to the **Section box** and add our first section, Checkout Desk. Click the button **Add Section to Current Sublocation**. The Checkout Desk will now show up in the list of **sections** for the current **Sublocation**. Now we’ll add our remaining sections.
Once our sections on the first floor are in, we’ll click the **Add Current Sublocation** button. Now we can see Floor 1 listed as a sublocation above. Then we’ll add the name of the second sublocation and its sections.
After we have all our sections and sublocations added, we’ll click **Save**. The final step is assigning the template to our location. Click **Assign**. Find the name of the location in the list of locations that have not been assigned a template and place a **checkmark** in the box. Click **Save**. Check out our other articles to learn more about how you can use your sublocation templates.
---
## What is it?
A sublocation section template is an excellent way to break down larger service locations into manageable chunks so that the inspections can be more detailed. If you have a smaller service location, you can usually get away with just using the job template rather than using a sublocation template. If, however, you are inspecting a large building like a school, hospital, or mall then you will definitely want to use a sublocation template.
## Terminology
1. **Service Location** – Generally the physical building being serviced. This is needed in order to assign the sublocation template. For a refresher on Service Locations see the video and article [Create a Service Location Record](https://help.otuvy.com/kb/create-a-service-location-record?hsLang=en)
2. **Sublocation** – The first level you can break down a service location. Generally used to represent floors or wings within a service location. Example: Floor 1 or Terminal A
3. **Section** – The second level you can break down a service location. Each section is inside a sublocation. Often sections are used to represent specific rooms or features like corridors, stairwells, entrances, loading docks, etc. Example: Office 104 or Men’s Restroom
4. **Areas** – Areas refer to the area type assigned to a service inside the job template. Try not to confuse Areas with Sections since Areas is an area type that can be repeated several times (like restrooms) whereas sections are the specific rooms or sections of a sublocation. For a refresher on areas and job templates see [Create a Job Template](https://help.otuvy.com/kb/create-a-job-template?hsLang=en)
## Let’s Get Started
Login to Otuvy QM, click on the **Admin** tab and then click on the **Sublocation Templates** link in the *Other* section.
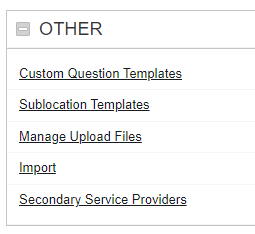
From the Sublocation Template Search page, click on **New Sublocation Template** on the right above the search results.
In the **Main Information** fields, put a descriptive name for the template and an optional description.
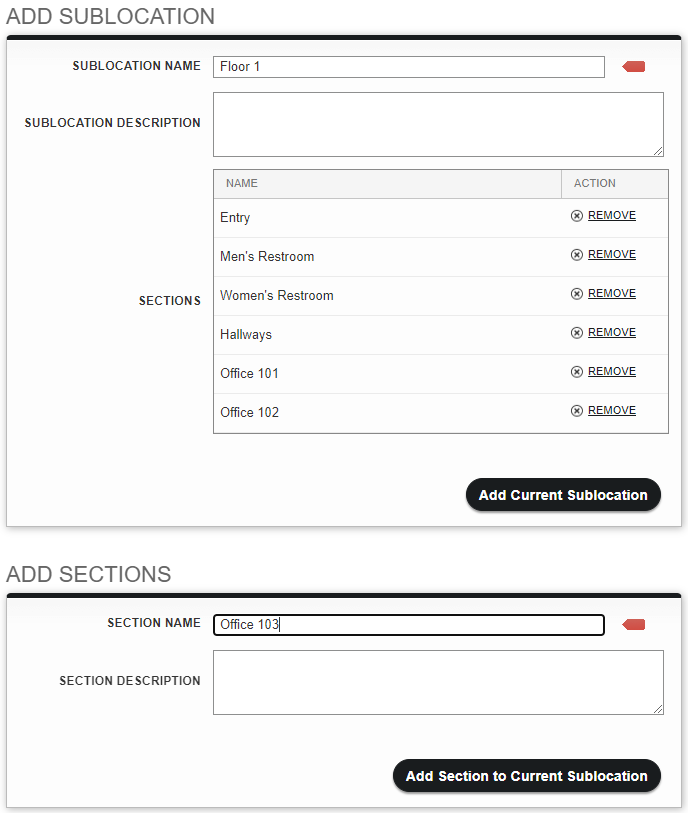
Next, we will start fleshing out the sublocations and sections. You should see a list of Sublocations, an Add Sublocation window and an Add Sections window. First, add your sublocation’s name and begin adding sections to the sublocation. **DO NOT** click add current sublocation until you have all the sections added to it. In the example below, you can see we have started creating the Sublocation named Floor 1 and have added some sections to it. We are about to add the section named Office 104 by clicking the blue button titled **Add Section to Current Sublocation**.
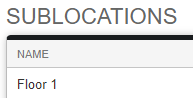
Now that we have all the needed sections for **Floor 1** we click the blue button titled **Add Current Sublocation** to add that entire sublocation and all its sections to the template. You can see in the example below that we now have one sublocation titled **Floor 1** added to this template.
Once you have repeated these steps to add all the needed sublocations and sections to your template, click the **Save** button and then assign the template to a service location.
## Assign the Sublocation Template
There are three different ways you can assign a sublocation template once it has been created. From the main information page for the template itself, from the search results page for the sublocation templates and from the service location record page
### Assign the Sublocation Template Via Main Information
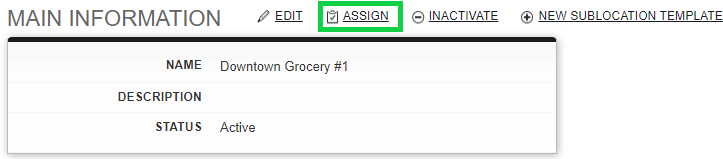
To get to the main information for a sublocation template, first, click on **Admin** and then on **Sublocation Templates i**n the *Other* section. Then navigate to the sublocation template in question in the search results or by using the search bar on that page. Click on the name of the template to open it up. You will find the **Assign** button next to the **Main Information** title as seen below
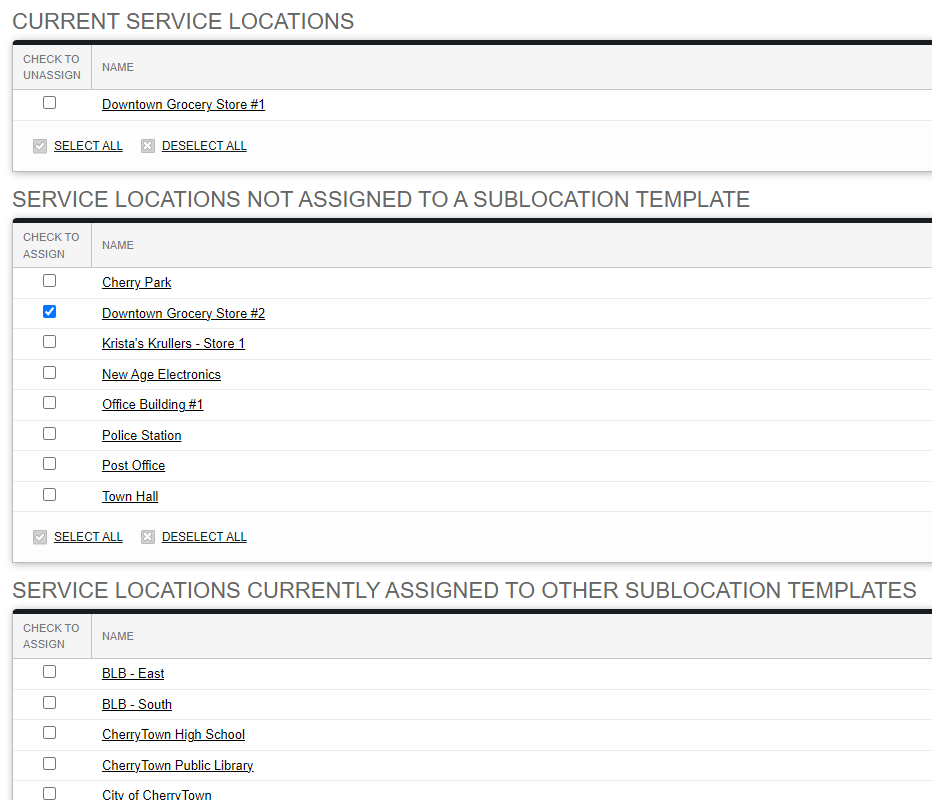
When you click **Assign** a pop-up window will appear showing all locations. This will be split into Current service locations where the sublocation template is already assigned, service locations not assigned a sublocation template and service locations already assigned a sublocation template. To add the sublocation template to a service location, select the checkbox next to the service location(s) you want to assign the template to and then click the **Save** button at the top of the screen. In the example below, our template is already assigned to Downtown Grocery Store #1 but we also want to assign the template to an identical building Downtown Grocery Store #2
### Assign the Sublocation Template Via Search Results Page
Similar to assigning the sublocation template from the template’s main information page, you can assign a template via the search results page. Before you click on the name of the template, just click **Assign** in the same row as the template name as shown below.

Once you do this, just follow the same steps with the pop-up window as described above.
### Assign the Sublocation Template Via the Location Record
Another way to assign a sublocation template is from the **Service Location** record page. To get to that one, just navigate to the service location in question and scroll down to the *Sublocation Templates* section underneath the Inspections and Custom Question Templates.
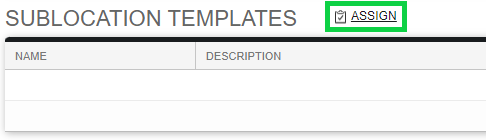
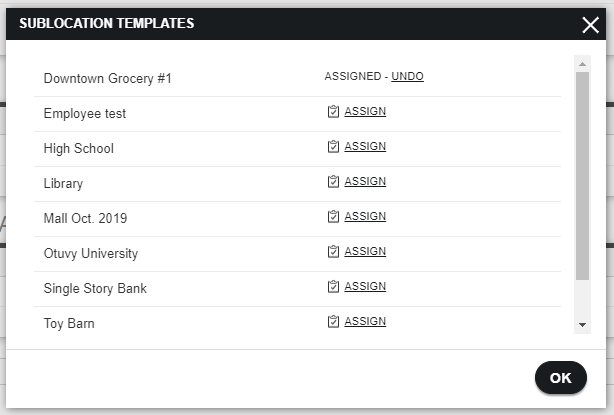
Once you get here, click the **Assign** link to open the Sublocation Templates assignment window. Click on the **Assign** link on any of the templates you want to assign and then click the blue **OK** button. In the example below, we have clicked **Assign** next to Downtown Grocery #1 and we see the system has told us that it has been selected to be assigned.
## Using Sublocation/Section Templates in Work Orders
Once you've assigned a Sublocation/Section template to a location, you can leverage that template in work orders if you want. There are two ways you can do this. The first is by checking the box shown below from the template's assignment page you get to in the **Assign the Sublocation Template Via Main Information** section above.

The second way is by checking the box next to the **Sublcoation Template(s)** assigned on the service location record, seen below.

- [Otuvy QM - Getting Started](https://help.otuvy.com/kb/otuvy-qm-getting-started?hsLang=en)
- [Otuvy QM - Setup & Administration](https://help.otuvy.com/kb/otuvy-qm-setup-administration?hsLang=en)
- [Otuvy QM - Contact Access](https://help.otuvy.com/kb/otuvy-qm-contact-access?hsLang=en)
- [Otuvy QM - Inspections](https://help.otuvy.com/kb/otuvy-qm-inspections?hsLang=en)
- [Otuvy QM - Work Orders](https://help.otuvy.com/kb/otuvy-qm-work-orders?hsLang=en)
- [Otuvy QM - Mobile App](https://help.otuvy.com/kb/otuvy-qm-mobile-app?hsLang=en)
- [Otuvy QM - Reports & Dashboards](https://help.otuvy.com/kb/otuvy-qm-reports-dashboards?hsLang=en)
- [Otuvy QM - Advanced Features](https://help.otuvy.com/kb/otuvy-qm-advanced-features?hsLang=en)
- [Otuvy Frontline](https://help.otuvy.com/kb/otuvy-frontline?hsLang=en#main-content)
- [Getting Started](https://help.otuvy.com/kb/otuvy-frontline?hsLang=en#getting-started)
- [Mobile App](https://help.otuvy.com/kb/otuvy-frontline?hsLang=en#mobile-app)
- [Admin Portal](https://help.otuvy.com/kb/otuvy-frontline?hsLang=en#admin-portal)
- [Uncategorized](https://help.otuvy.com/kb/uncategorized?hsLang=en)
[](https://www.otuvy.com/)
[mailto:email@email.com](mailto:email@email.com)
Copyright © 2026, Otuvy, Inc.