
Giving an Employee or Contact Access to Otuvy QM
Video Transcript
Employees and contacts can be given access to CleanTelligent by activating their User Information. First, they’ll need an active record. See our article about how to create an Employee record or a Contact record before watching this video.
The steps to activate user access is the same for employees and contacts, but there are differences in their permissions. For this video, we’ll show you permissions for an employee. Contact permissions are explained in the accompanying article.
Let’s start by opening our employee record. Click the HR tab. Employee records that are in this list have active records. This black silhouette represents records that also have Active User Access. Employees that have had their User Information inactivated will still be in this list until you inactivate their record. You can find them by changing the status in the search factors.
Click on the name of the employee to open their record. Double check that the person has an email address in their Main Information before proceeding. If there isn’t an email address, click Edit next to the Main Information box to add that.
Below the Main Information box, you will find the User Information box, which should be blank for a newly created user. When you are ready, click New above the User Information box.
The system will automatically set the username for new users as the email address. If you’d like to change it, you can. When you click save, the system will send an email to your employee with their new username and a random password. However, before you click save, you need to give the user permission to access the different parts of the software. The Module Permissions are below. Click Expand All to see everything. Admin users who are placed in the highest division of the SP Org Chart, like Ann, will have all permissions, which means you won’t need to manually select permissions. Other employees can be assigned Module Permission Templates, or you can manually allow permissions one by one by expanding each section. For more information about the different permissions, read the article about Module Permissions. As a final note, billing information will show up at the top of the page to show you the cost of your new user. Different permissions have different costs, but only affect HR users. Contact users are free.
To finish activating the User Information, click Save. Remind your employee that they will have an email and have them login from a computer the first time so they can sign the End User Agreement.
Activating Employees
After creating a record for your employees or contacts, they can be given access to Otuvy QM by creating and activating their user information.
Activating a New Employee's User Info
Start on the Employee’s record by clicking the HR tab, then clicking the name of the employee from the list. For newly created records, the user information box will be empty.
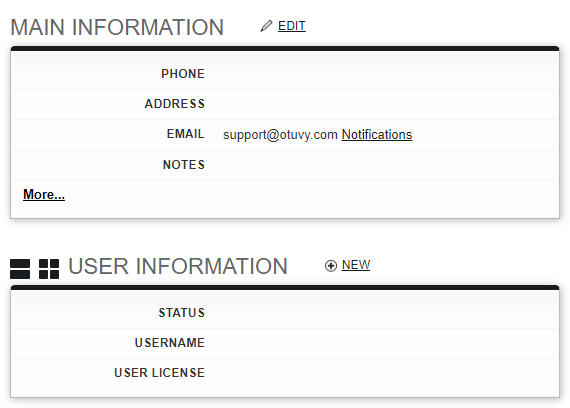
Click New to create the user's information and assign module permissions to your employee.

Your Employee must have an email address to activate their user information.
In the User Information box, the Username field is pre-filled with the employee’s email address. You can change this to anything, but remember that the Username is also case-sensitive, just like the password.
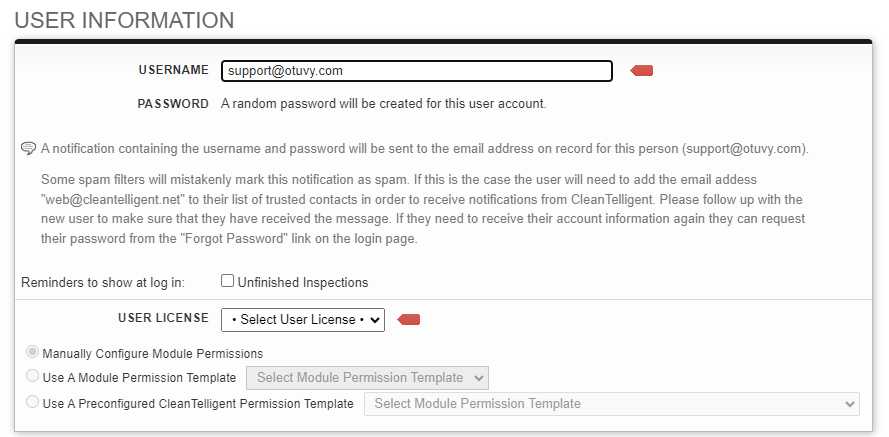
The User License determines what set of permissions can be assigned to a user. You must select one from the dropdown shown below. If you don't see this dropdown, it means you are in a contract that doesn't separate licenses into license types. You won't need to select the license type.
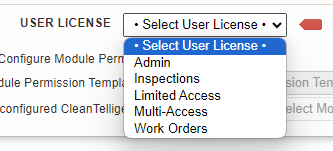
Let's go over what each license has available to it.
- Admin: Admin licenses can have access to all functionality within Otuvy QM and are only limited by the module permissions assigned and their position in the SP Organization Chart
- Inspections: Inspection licenses can only have access to reporting, dashboards, as well as the client, location, contact, and employee information needed to perform inspections
- Work Orders: Work Orders licenses can only have access to reporting, dashboards, as well as the client, location, contact, and employee information needed to perform work orders.
- Limited Access: Limited Access licenses are a free license which only has access to reporting and dashboards. This is great for an Accounts Payable employee who needs to know who is being paid for within Otuvy QM.
- Multi-Access: Multi-Access licenses can have all permissions except those found on the Admin tab and do not have the ability to create or inactivate Clients, Locations, Contacts, or Employees
Permission templates can save you a lot of time when it comes to activating a new user. Learn more about Module Permission Templates by reading the Create a Module Permission Template article. If you’d prefer to assign permissions manually, expand the sections below one by one by clicking the plus sign next to the section name, or click the Expand All button above the list.
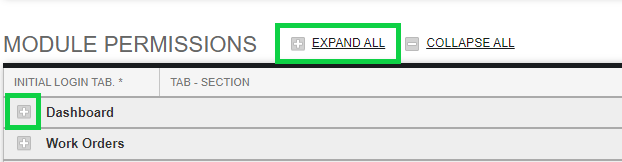
Above the list of Module Permissions, there are options: All Deny, All View Only, All View & Edit, and All Permissions. Selecting any of these options will automatically update all permissions below to match the selection. Note that setting All Permissions will still limit permissions to those available to the license type assigned above.

At the top of each section, there is a selector icon. If you select this on one of the sections, the corresponding tab will be the default view upon login for that user. If none of them are selected, the initial login tab will be the first available tab. Contact our Support team for more information about the individual permissions.
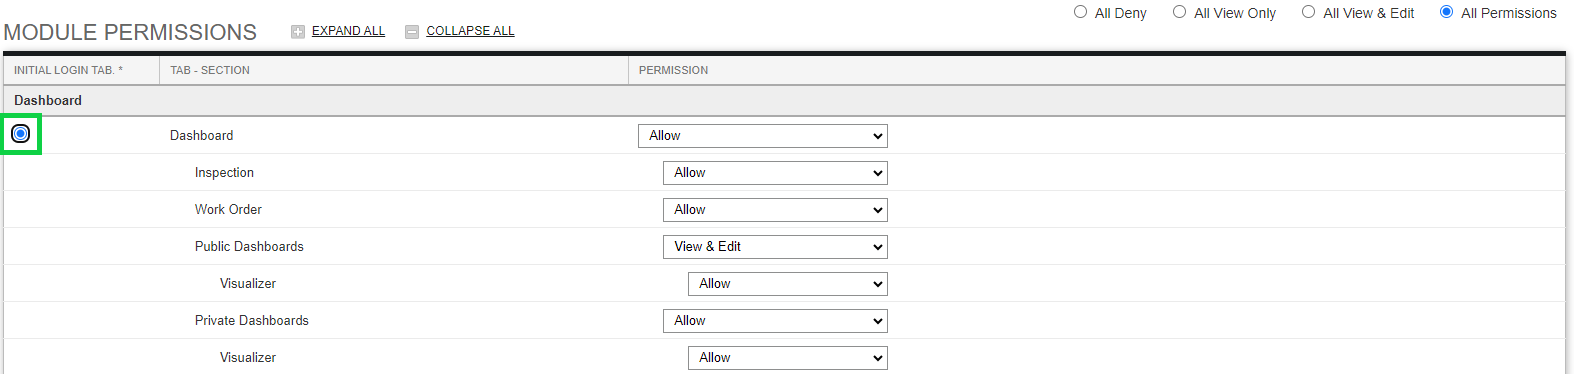

For an in-depth discussion about what each module permission allows, contact Product Support at support@otuvy.com
When you’ve finished assigning permissions to a user, click Save. The system will automatically send the user an email with their username and a temporary password. Have them double-check for the email in their junk/spam folder if it isn’t in their inbox. The best practice is to have the employee log in on a computer before logging in on a mobile device, that way they can sign the End User Agreement. After logging in, employees can change their password at any time by following the steps in the How To Reset Your Password article in the Knowledge Base.
Reactivating an Employee's User Info
Employees whose user information has been inactivated can be activated again by clicking Edit above the User Information box.
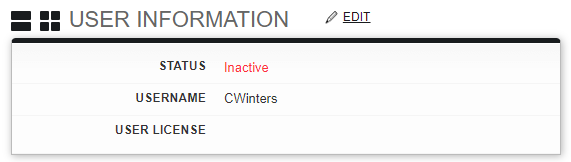
Changing the status from Inactive to Active will restore any permissions that the user had when they were active before. Double-check the permissions by clicking the Expand All button to see the currently assigned permissions and make any necessary changes before clicking Save.

Reactivating a user does not change their username or password from what they had before. It’s good practice to send a username reminder email and password reset link email when reactivating someone who has been inactive for more than a few months.
Activating Contacts
Activating a New Contact's User Info
Activating a Contact User is very similar to activating an Employee. Start by clicking the Contacts tab, then click the name of the contact to open their record.
For newly created contacts, the User Information box will be empty. Remember, in order to activate user access, the contact must have an email address already entered in their record. If they have their email address in and ready, click New next to User Information.
The email address is automatically entered as the username. You may change it if desired. As with employees, a module permission template can be used to simplify the process of activation. Choose from the Permission templates that you’ve created or one from Otuvy QM, or manually choose the permissions.
Contact permissions are simpler than HR permissions. One major change is that Work Orders are called Messages from a Contact’s perspective. Another difference is that in order for them to change their own information like contact details or password, you must give them the My Info permission.
For more details on the Module Permissions for a Contact, contact our Support team.
Contact users are free for your company. You can activate as many as you need without worrying about your monthly access fees rising!
After assigning permissions, click Save. An email will automatically be sent to the contact with their username and a temporary password. The best practice would be to reach out to them to remind them to look for the email after you’ve activated them.
Reactivating a Contact's User Info
Whether a contact was inactivated because they had a position change that changed their status, or because they were removed for not using the software, you can reactivate their user information just the same as employees.
Starting on the Contact Record, click the Edit button above the User Information box. Change the status to Active by using the drop-down menu. Before clicking Save, double-check the Contact’s Module Permissions in case they will be changing from what they were before inactivation.