---
title: Importing Clients
description: "Learn how to bulk import client records into Otuvy QM: set up the SP org chart first, fill the required Client Name and SP Division, then upload."
---
[Skip to content](https://help.otuvy.com/kb/importing-clients#main-content)
[More support](https://help.otuvy.com/kb/kb-tickets/new?hsLang=en)

Open main navigation
Close main navigation
- [More support](https://help.otuvy.com/kb/kb-tickets/new)
- [Contact us](mailto:vip@otuvy.com)
[Contact us](mailto:vip@otuvy.com)
How can we help you?
- There are no suggestions because the search field is empty.
1. [Otuvy Knowledge Base](https://help.otuvy.com/kb?hsLang=en)
2. [Otuvy QM - Setup & Administration](https://help.otuvy.com/kb/otuvy-qm-setup-administration?hsLang=en)
# Importing Clients
# Importing Clients
### Video Transcript
The topic of this video is on importing client records.
Before importing clients, be sure to create a spot for them to reside on the **SP Org Chart** . For the most part, client records will reside in the **Admin** division because the admin is the only one that needs to see the client record.
To import client records, use the Client Import spreadsheet. If you do not receive this spreadsheet from a CleanTelligent representative, you can find it in the system by clicking the **Admin** tab, scroll down to the **Other** section, then select **Imports** . You can find all import files here, but for this video, you’ll choose **Import Clients** , then the **Sample Import Template.**
I’ve entered in my clients into this spreadsheet. **Bolded** columns are required. For Clients, the only information you really need is the **Client Name** and **SP Division** . No other information is required.
Once the file is filled in and saved, return to the web browser and select **Choose File** . Select the file you just created. Click on **Upload** .
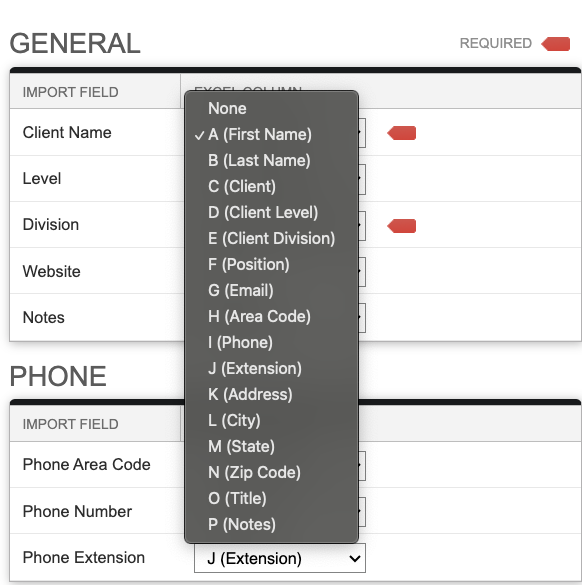
Once the window opens, the fields will auto populate, but if they do not, match the field names to the columns you filled in.
Click **Continue** and a preview window will open showing you what information you are importing. Click on **Import Clients** and you’re done!
If you’d like to see the clients imported, click on the **Clients** tab and you’ll see them in your list of clients.
---
## Article
### Why Import
When getting started with a new record, importing your records can be a fast and easy way to get things set up and imported into Otuvy QM.
**\*Note\*** Before importing a record you will need to have a place in the SP Org Chart where you want the record imported to. Follow the instructions in our [SP Org Chart video to learn more.](https://help.otuvy.com/kb/build-a-basic-service-provider-organization-chart?hsLang=en)
### Getting Started
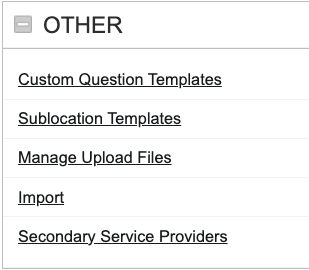
Whether you are importing a client, contact, service location, job template etc. You will always start at the same point. Navigate to the Admin Configuration page by clicking on Admin in the main navigation bar and scroll down to the **Other** section. Click on the **Import** link.
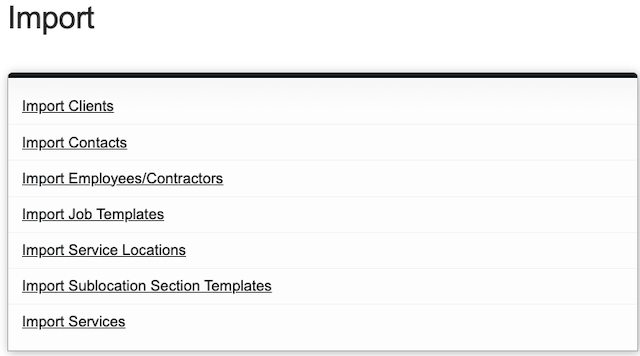
On this page you will see links to all the different import tools available to you. Since we are talking about Client imports, we are going to click on **Import Clients**
### Download the Template
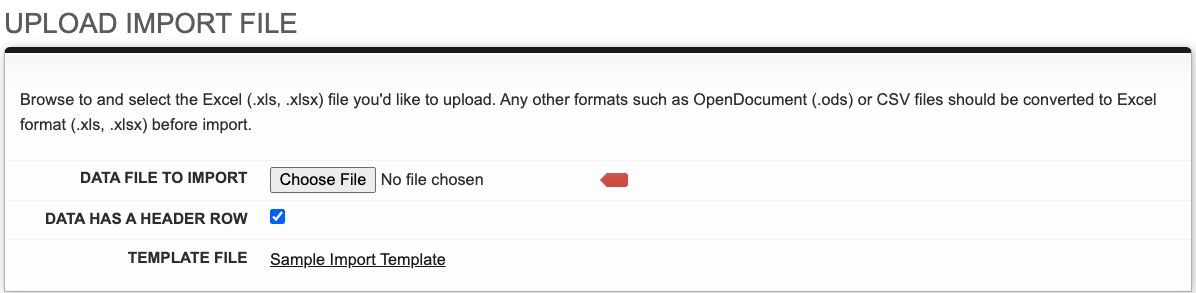
Within the Upload Import File box, click Sample Import Template to download an excel file for you to fill out. Save it to your computer and open the file up.
**\*Best Practices\*** Save the downloaded file and keep it blank as a starting point for future imports. Use the Save As functionality in Excel to save and rename the file so your template stays fresh and unchanged.
### Fill in the Data
When you first open the template, there will be various columns with headers. Some of the headers will be bold and some won’t. The bolded headers indicate a required field. Here’s an example of what the Client Import Template looks like.
Let’s go over all the information, one field at a time.
1. **Client Name** The Client Name field is a **required** field and will usually be the name of the client company. While it is not case sensitive, the capitalization that is entered here will be exactly how the client name will be created.
2. **SP Level** The SP Level field is an optional field and refers to the Level or column inside the Service Provider Organization Chart where you will find the Division you are going to put this service location. This is a **case sensitive** field and must match up with an existing SP Level. If you need a refresher on the SP Org Chart please check out our [Build a Basic Service Provider Organization Chart video.](https://help.otuvy.com/kb/build-a-basic-service-provider-organization-chart?hsLang=en)
3. **SP Division** The SP Division field is a **required** field. This field will indicate where in your SP Org Chart the service location will be found. This is a **case sensitive** field and must match up with an existing SP Division.
4. **Address**The Address field is an optional field and will represent the Street Address ONLY. While you can put in the city, state and zip code in this field, it will look silly when you also put those values in their own fields.
5. **City, State and Zip Code** The City, State and Zip Code fields are optional fields. Just put in the corresponding information into each field.
6. **AreaCode** The Area Code field is optional. If you put in a phone number for the client place the 3 digit area code in this field
7. **Phone** The Phone field is optional. If you put in a phone number for the client place the 7 digits after the area code in this field
8. **Extension** The Extension field is optional. If you put in a phone number for the client and there is an extension place it in this field
9. **Website** The Website field is optional and will usually reflect the url of the client’s website’s homepage
10. **Notes** The Notes field is optional and should contain notes specific to that client that do not fit into any other fields
### Upload the Data
Once you have filled in the information and saved, return to the upload page select the file and click **Upload** in the top right corner of the page. This will pull up a screen that tries to match up the columns in the file to the data needed to run the upload. Make sure that the correct column is represented in the right places.
If there are no errors, the system will give you a preview of the information about to be imported. If everything looks good, click **Import Clients** in the top right of the page, otherwise, you can click **Back** to change what columns are associated with what data or you can click **Cancel Upload** if you need to make changes in the excel document. Once you make those changes, just restart the upload process.
### Encountering Errors
Occasionally you may run across errors in the upload process, most of the errors are due to small oversights and can usually be fixed. The most common cause of all errors is Case Sensitivity and spelling. If you believe that the error you are getting is incorrect, double-check in CleanTelligent that you have the right spelling and capitalization. Here’s an example of the most common error when dealing with Client Imports.
#### Rows with invalid Division and or Level
When you encounter this error, double-check that the appropriate column is selected by clicking on the **Back** button. If this doesn’t fix it, double-check the spelling and capitalization of the division or level and make sure to cross-check the name of the division in the SP Org Chart. Again, if you need a refresher on the SP Org Chart please check out our [Build a Basic Service Provider Organization Chart video.](https://help.otuvy.com/kb/build-a-basic-service-provider-organization-chart?hsLang=en)
- [Otuvy QM - Getting Started](https://help.otuvy.com/kb/otuvy-qm-getting-started?hsLang=en)
- [Otuvy QM - Setup & Administration](https://help.otuvy.com/kb/otuvy-qm-setup-administration?hsLang=en)
- [Otuvy QM - Contact Access](https://help.otuvy.com/kb/otuvy-qm-contact-access?hsLang=en)
- [Otuvy QM - Inspections](https://help.otuvy.com/kb/otuvy-qm-inspections?hsLang=en)
- [Otuvy QM - Work Orders](https://help.otuvy.com/kb/otuvy-qm-work-orders?hsLang=en)
- [Otuvy QM - Mobile App](https://help.otuvy.com/kb/otuvy-qm-mobile-app?hsLang=en)
- [Otuvy QM - Reports & Dashboards](https://help.otuvy.com/kb/otuvy-qm-reports-dashboards?hsLang=en)
- [Otuvy QM - Advanced Features](https://help.otuvy.com/kb/otuvy-qm-advanced-features?hsLang=en)
- [Otuvy Frontline](https://help.otuvy.com/kb/otuvy-frontline?hsLang=en#main-content)
- [Getting Started](https://help.otuvy.com/kb/otuvy-frontline?hsLang=en#getting-started)
- [Mobile App](https://help.otuvy.com/kb/otuvy-frontline?hsLang=en#mobile-app)
- [Admin Portal](https://help.otuvy.com/kb/otuvy-frontline?hsLang=en#admin-portal)
- [Uncategorized](https://help.otuvy.com/kb/uncategorized?hsLang=en)
[](https://www.otuvy.com/)
[mailto:email@email.com](mailto:email@email.com)
Copyright © 2026, Otuvy, Inc.