---
title: Importing Service Locations
description: "Learn how to bulk import service locations into Otuvy QM: required fields, time zones, org chart divisions, and how to fix common import errors."
---
[Skip to content](https://help.otuvy.com/kb/importing-service-locations#main-content)
[More support](https://help.otuvy.com/kb/kb-tickets/new?hsLang=en)

Open main navigation
Close main navigation
- [More support](https://help.otuvy.com/kb/kb-tickets/new)
- [Contact us](mailto:vip@otuvy.com)
[Contact us](mailto:vip@otuvy.com)
How can we help you?
- There are no suggestions because the search field is empty.
1. [Otuvy Knowledge Base](https://help.otuvy.com/kb?hsLang=en)
2. [Otuvy QM - Setup & Administration](https://help.otuvy.com/kb/otuvy-qm-setup-administration?hsLang=en)
# Importing Service Locations
# Importing Service Locations
### Video Transcript
In this video, I'll demonstrate how to import service locations into CleanTelligent.
This is the **Service Locations** **Import spreadsheet**. If you do not receive this spreadsheet from a CleanTelligent representative, you can also find it in the system if you click the **Admin** tab, scroll down to the **Other** section, and click on **Import**. You can find all import files here, but for this video you’ll choose **Import** **Service** **Locations**, then **Sample** **Import** **Template** to open the spreadsheet.
Here's my spreadsheet. I’ve entered a few example locations with the required information in order for it to be successfully imported. You’ll notice the **Service** **Location**, **SP Division**, **Client**, and **Client** **Division** column titles are bold. This means they are required to fill out. The **SP Division** and **Client Division** both have to match up with division names you’ve already put into the system. I’ve also filled out the **address**, **city**, **state** and **zip code** columns. When uploading a service location with an address, the **Time Zone** is also required. You can find this in the **List of Time Zones** on the **Import** page then enter the **Identifier** into your spreadsheet.
When you’ve finished filling out this spreadsheet, **save** it to your computer.
The next step I’ll be going over is how to complete the import into your CleanTelligent system. Return to the **Import** page. Here, you’ll click **Choose File**, select the file where you previously saved it, and click **Upload**. On this page, you’ll see several drop-down lists. These auto-populate on their own, but if they don’t, match the fields with their corresponding name on the template.
Once you have all the applicable drop downs selected, click **Continue**. If everything looks correct on this page, click **Import**. When it successfully uploads, it will indicate and you will be able to find this information in the Locations tab.
---
## Article
### Why Import
When getting started with a new record, importing your records can be a fast and easy way to get things set up and imported into Otuvy QM.
**\*Note\*** Before importing a record you will need to have a place in the SP Org Chart where you want the record imported to. Follow the instructions in our [Build a Basic SP Organization Chart video to learn more.](https://help.otuvy.com/kb/build-a-basic-service-provider-organization-chart?hsLang=en)
### Getting Started
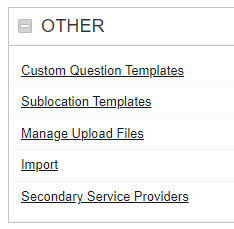
Whether you are importing a client, contact, service location, job template etc. You will always start at the same point. Navigate to the Admin Configuration page by clicking on Admin in the main navigation bar and scroll down to the **Other** section. Click on the **Import** link.
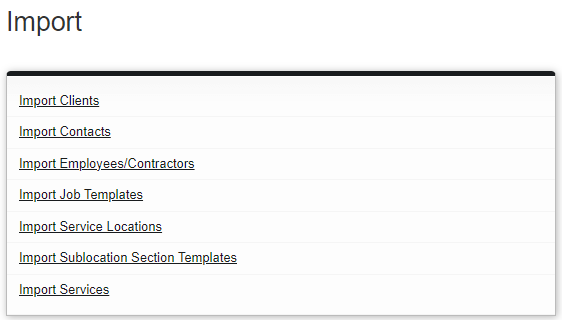
On this page you will see links to all the different import tools available to you. Since we are talking about Service Location imports, we are going to click on **Import Service Locations**
### Download the Template
Within the Upload Import File box, click **Sample Import Template** to download an excel file for you to fill out. Save it to your computer and open the file up.
**\*Best Practices\*** Save the downloaded file and keep it blank as a starting point for future imports. Use the Save As functionality in Excel to save and rename the file so your template stays fresh and unchanged.
Also, on this page is an important link if the service locations you will be importing are in a different time zone than your default one. It is the **List of Time Zones** link that you find underneath the **Sample Template** download link. If you click on **List of Time Zones** then there will be a pop up that you can copy and paste the exact text for you to populate in the spreadsheet.
**\*NOTE\*** If all the service locations in the import list are the same time zone as your account then you can leave that column blank.
### Fill in the Data
When you first open the template, there will be various columns with headers. Some of the headers will be bold and some won’t. The bolded headers indicate a required field. Here’s an example of what the Service Locations template looks like.
Let’s go over all the information, one field at a time.
1. **Service Location** The Service Location field is a **required** field and is the name that you are giving to your service location. While it is not case sensitive, the capitalization that is entered here will be exactly how the service location name will be created.
2. **SP Level** The SP Level field is an optional field and refers to the Level or column inside the Service Provider Organization Chart where you will find the Division you are going to put this service location. This is a **case sensitive** field and must match up with an existing SP Level. If you need a refresher on the SP Org Chart please check out our [Build a Basic Service Provider Organization Chart video.](https://help.otuvy.com/kb/build-a-basic-service-provider-organization-chart?hsLang=en)
3. **SP Division**The SP Division field is a **required** field. This field will indicate where in your SP Org Chart the service location will be found. This is a **case sensitive** field and must match up with an existing SP Division.
4. **Client**The Client field is a **required** field. This field will associate the service location with a particular client that has already been created in Otuvy QM. This is a **case sensitive** field and must match up with an existing Client record. For a refresher on creating a client in Otuvy QM please check out our [Create a Client Record video.](https://help.otuvy.com/kb/create-a-client-record?hsLang=en)
5. **Client Level** The Client Level field is an optional field. It is similar to the SP Level field but deals with the Client Org Chart level. It is **case sensitive** and must match up with an existing Client Level within the specified Client’s org chart. For a refresher on creating a Client Org Chart in Otuvy QM please check out our [Build a Basic Client Organization Chart video.](https://help.otuvy.com/kb/build-a-basic-client-organization-chart?hsLang=en)
6. **Client Division**The Client Division field is a **required** field. This field will indicate where in your Client Org Chart for this Client the location will be found. This is a **case sensitive** field and must match up with an existing Client Division.
7. **Address**Address field is an optional field and will represent the Street Address ONLY. While you can put in the city, state and zip code in this field, it will look silly when you also put those values in their own fields.
8. **City, State and Zip Code**The City, State and Zip Code fields are optional fields. Just put in the corresponding information into each field.
9. **Time Zone** The Time Zone field is optional. If left blank, the time zone will default to your Service Provider’s time zone. Only fill this in if the time zone of the Service Location differs from that of the Service Provider. For reference to the time zones, just remember to click the **List of Time Zones** link we referenced to earlier in this article.
10. **Area Code**The Area Code field is optional. If you put in a phone number for the service location place the 3 digit area code in this field
11. **Phone**The Phone field is optional. If you put in a phone number for the service location place the 7 digits after the area code in this field
12. **Extension** The Extension field is optional. If you put in a phone number for the service location and there is an extension place it in this field
13. **Internal Identifier** The Internal Identifier field is optional and often overlooked. It is only leveraged inside custom reports and you can find the information from it in the Main Info section of the service location. For information regarding Custom Reports and Report Writer.
14. **Notes**The Notes field is optional and should contain notes specific to that service location that do not fit into any other fields
### Upload the Data
Once you have filled in the information and saved, return to the upload page select the file and click **Upload** in the top right corner of the page. This will pull up a screen that tries to match up the columns in the file to the data needed to run the upload. Make sure that the correct column is represented in the right places.
If there are no errors, the system will give you a preview of the information about to be imported. If everything looks good, click **Import Clients** in the top right of the page, otherwise you can click **Back** to change what columns are associated with what data or you can click **Cancel Upload** if you need to make changes in the excel document. Once you make those changes, just restart the upload process.
### Encountering Errors
Occasionally you may run across errors in the upload process, most of the errors are due to small oversights and can usually be fixed. The most common cause of all errors is Case Sensitivity and spelling. If you believe that the error you are getting is incorrect, double-check in Otuvy QM that you have the right spelling and capitalization. Here’s an example of the most common errors when dealing with Service Location Imports.
#### Rows with invalid Division and or Level
When you encounter this error, double check that the appropriate column is selected by clicking on the **Back** button. If this doesn’t fix it, double-check the spelling and capitalization of the division or level and make sure to cross check the name of the division in the SP Org Chart. Again, if you need a refresher on the SP Org Chart please check out our [Build a Basic Service Provider Organization Chart video.](https://help.otuvy.com/kb/build-a-basic-service-provider-organization-chart?hsLang=en)
#### Rows with an invalid Client Division and or Level
Similar to the SP Org Chart fields, double check that the appropriate column is selected for the Client Level and Client Division fields. Also check the spelling and capitalization. If needed, please check out our [Build a Basic Client Organization Chart video.](https://help.otuvy.com/kb/build-a-basic-client-organization-chart?hsLang=en)
#### Rows with a Client Name that doesn’t exist
This is often caused by either misspelling, incorrect capitalization or trying to upload the service locations for a client that has not been created yet. If this is the case be sure to watch and follow the instructions in our [Create a Client Record video.](https://help.otuvy.com/kb/create-a-client-record?hsLang=en)
#### Rows with Invalid Time Zone
Remember that the time zone field is case sensitive and must match the spelling exactly. Go back to the upload page and click the link that says **List of Time Zones** to make sure what you have entered in is correct. Also, make sure there are no spaces before or after the text in that field since that will also cause this error to occur.
- [Otuvy QM - Getting Started](https://help.otuvy.com/kb/otuvy-qm-getting-started?hsLang=en)
- [Otuvy QM - Setup & Administration](https://help.otuvy.com/kb/otuvy-qm-setup-administration?hsLang=en)
- [Otuvy QM - Contact Access](https://help.otuvy.com/kb/otuvy-qm-contact-access?hsLang=en)
- [Otuvy QM - Inspections](https://help.otuvy.com/kb/otuvy-qm-inspections?hsLang=en)
- [Otuvy QM - Work Orders](https://help.otuvy.com/kb/otuvy-qm-work-orders?hsLang=en)
- [Otuvy QM - Mobile App](https://help.otuvy.com/kb/otuvy-qm-mobile-app?hsLang=en)
- [Otuvy QM - Reports & Dashboards](https://help.otuvy.com/kb/otuvy-qm-reports-dashboards?hsLang=en)
- [Otuvy QM - Advanced Features](https://help.otuvy.com/kb/otuvy-qm-advanced-features?hsLang=en)
- [Otuvy Frontline](https://help.otuvy.com/kb/otuvy-frontline?hsLang=en#main-content)
- [Getting Started](https://help.otuvy.com/kb/otuvy-frontline?hsLang=en#getting-started)
- [Mobile App](https://help.otuvy.com/kb/otuvy-frontline?hsLang=en#mobile-app)
- [Admin Portal](https://help.otuvy.com/kb/otuvy-frontline?hsLang=en#admin-portal)
- [Uncategorized](https://help.otuvy.com/kb/uncategorized?hsLang=en)
[](https://www.otuvy.com/)
[mailto:email@email.com](mailto:email@email.com)
Copyright © 2026, Otuvy, Inc.