---
title: Setup a Mobile Survey
description: Learn how to set up and assign Mobile Surveys in Otuvy QM using QR codes and custom question templates, plus generate work orders from submissions.
---
[Skip to content](https://help.otuvy.com/kb/setup-a-mobile-survey#main-content)
[More support](https://help.otuvy.com/kb/kb-tickets/new?hsLang=en)

Open main navigation
Close main navigation
- [More support](https://help.otuvy.com/kb/kb-tickets/new)
- [Contact us](mailto:vip@otuvy.com)
[Contact us](mailto:vip@otuvy.com)
How can we help you?
- There are no suggestions because the search field is empty.
1. [Otuvy Knowledge Base](https://help.otuvy.com/kb?hsLang=en)
2. [Otuvy QM - Advanced Features](https://help.otuvy.com/kb/otuvy-qm-advanced-features?hsLang=en)
# Setup a Mobile Survey
# Setup a Mobile Survey
## What Are They?
Mobile surveys can take anonymous feedback or requests from anyone with a cell phone and QR Code reader. Mobile Surveys do not require an Otuvy QM login to submit.
## Prerequisites
Mobile Surveys are created using Custom Question Templates and can be assigned to Service Locations, Sublocations, and/or Sections. If you need to review how to create these, see the following articles:
1. [Custom Question Templates Overview](https://help.otuvy.com/kb/custom-question-templates-overview?hsLang=en)
2. [Create a Service Location Record](https://help.otuvy.com/kb/create-a-service-location-record?hsLang=en)
3. [Create a Sublocation/Section Template](https://help.otuvy.com/kb/create-a-sublocation-section-template?hsLang=en)
## Create the Survey
The first thing you need to do is set up a custom question template. Be sure to set it as a **Mobile Survey** in the **View Under** section, and then add your questions.
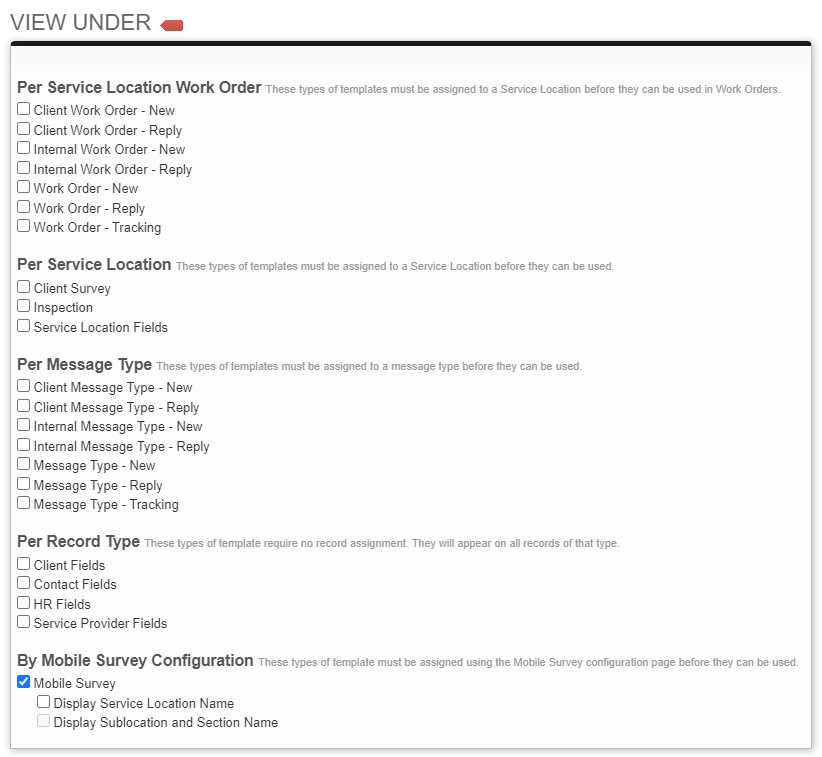
If you want to have anyone scanning the QR code answer all the questions assigned to the Service Location, Sublocation, or Section each time they scan the QR code, you can put all the questions in one **Custom Question Template** and then assign it following the instructions in the **Assign the Survey** section below.
## Optional Mobile Survey Template
**Mobile Survey Templates** allow you to assign multiple **Custom Question Templates** to a single survey and assign multiple Mobile Surveys to a single Service Location, Sublocation, or Section without requiring the user to submit all the surveys at the same time. Here are some examples that might help you decide.
### Example Survey with Only Custom Question Templates Assigned
Please scan this QR code to see what it looks like when only **Custom Question Templates** are assigned for the Mobile Surveys
### Example with Multiple Mobile Survey Templates Assigned
Please scan this QR code to see what it looks like with multiple **Mobile Survey Templates** assigned.
If you've decided you want to use **Mobile Survey Templates**, follow these instructions to set them up:
1. Create multiple **Custom Question Templates** following the instructions in the **Create the Survey** section above
2. Click on the **Admin** tab to navigate to the **Service Provider Configuration** page
3. In the **Job Configuration** section, click on **Mobile Survey Templates**
4. Above the Search Results, click on **New Mobile Survey Template**
5. Give your Mobile Survey Template a **Name**
6. **(Optional)** Set the Origin from Local to All or Parent SPs in order to include any Custom Question Templates shared from a Parent Service Provider account. If you created the Custom Question Templates on this account, you will leave this set to Local or All
7. Local: Shows any Custom Question Templates created using your company's Otuvy QM account (Selected by default)
8. Parent SPs: If your company has a Parent SP account and you *ONLY* want to include Custom Question Templates created in that Parent SP's Otuvy QM account, select this option.
9. All: If you want to include *BOTH* Custom Question Templates created using your company's Otuvy QM account *AND* any created in your Parent SP's Otuvy QM account, select this option.
10. Select one or more **Custom Question Templates** to be included in this one Mobile Survey Template.
11. Click **Save**
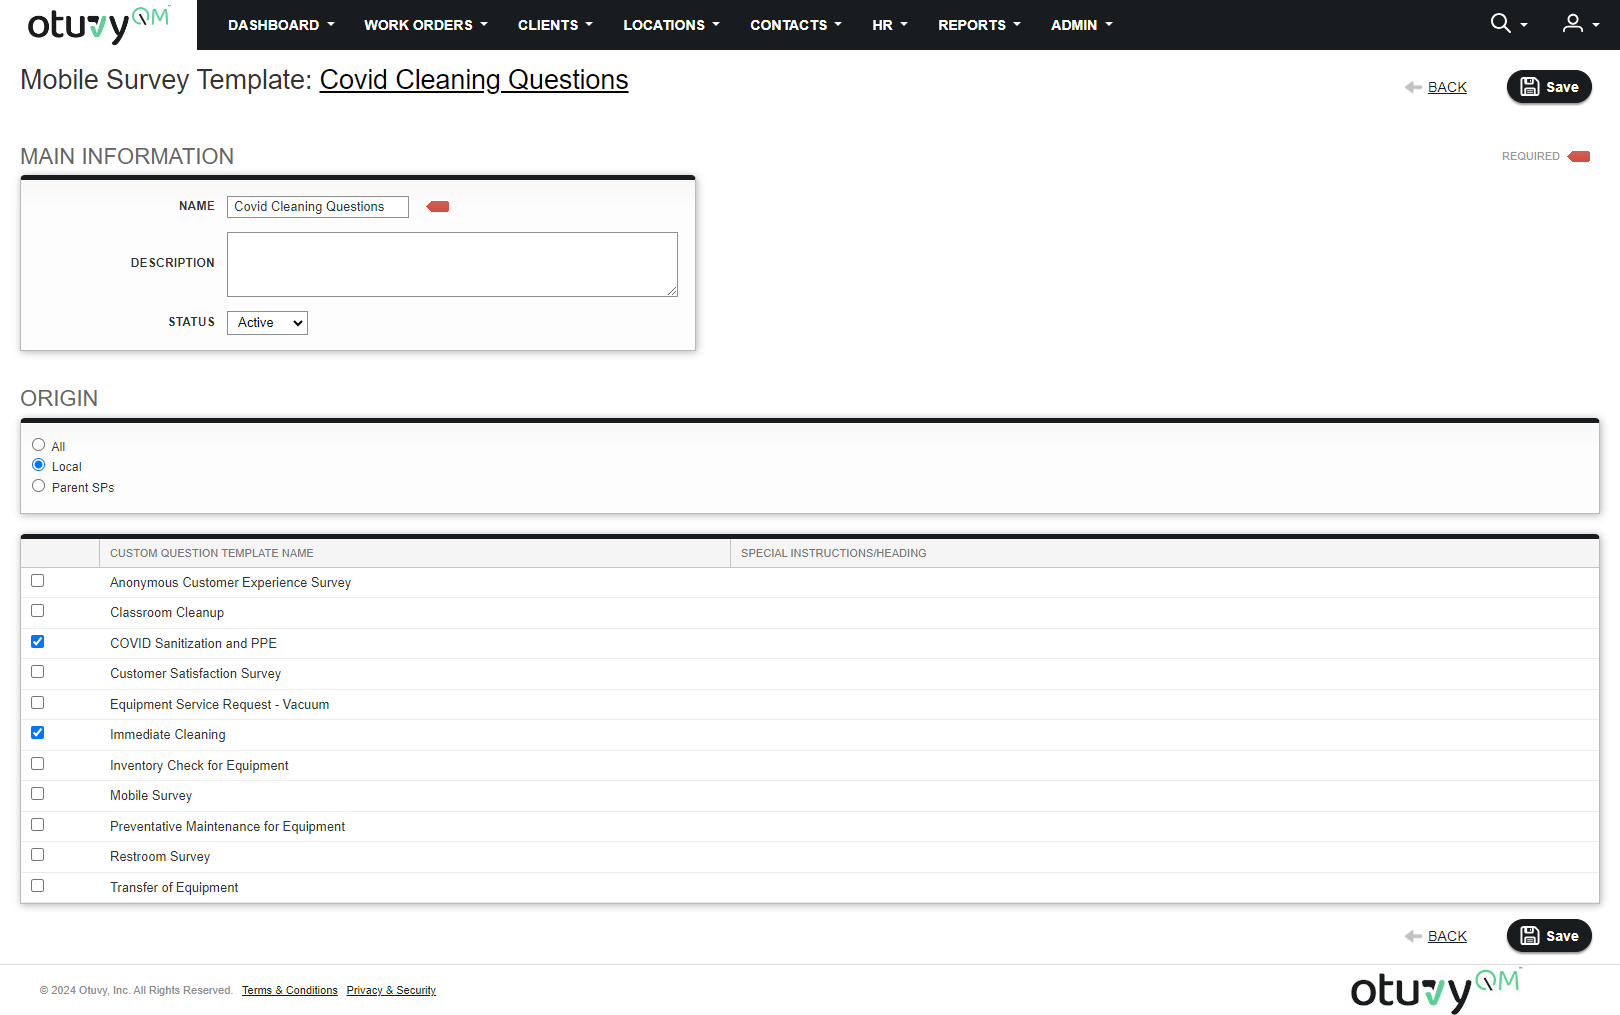
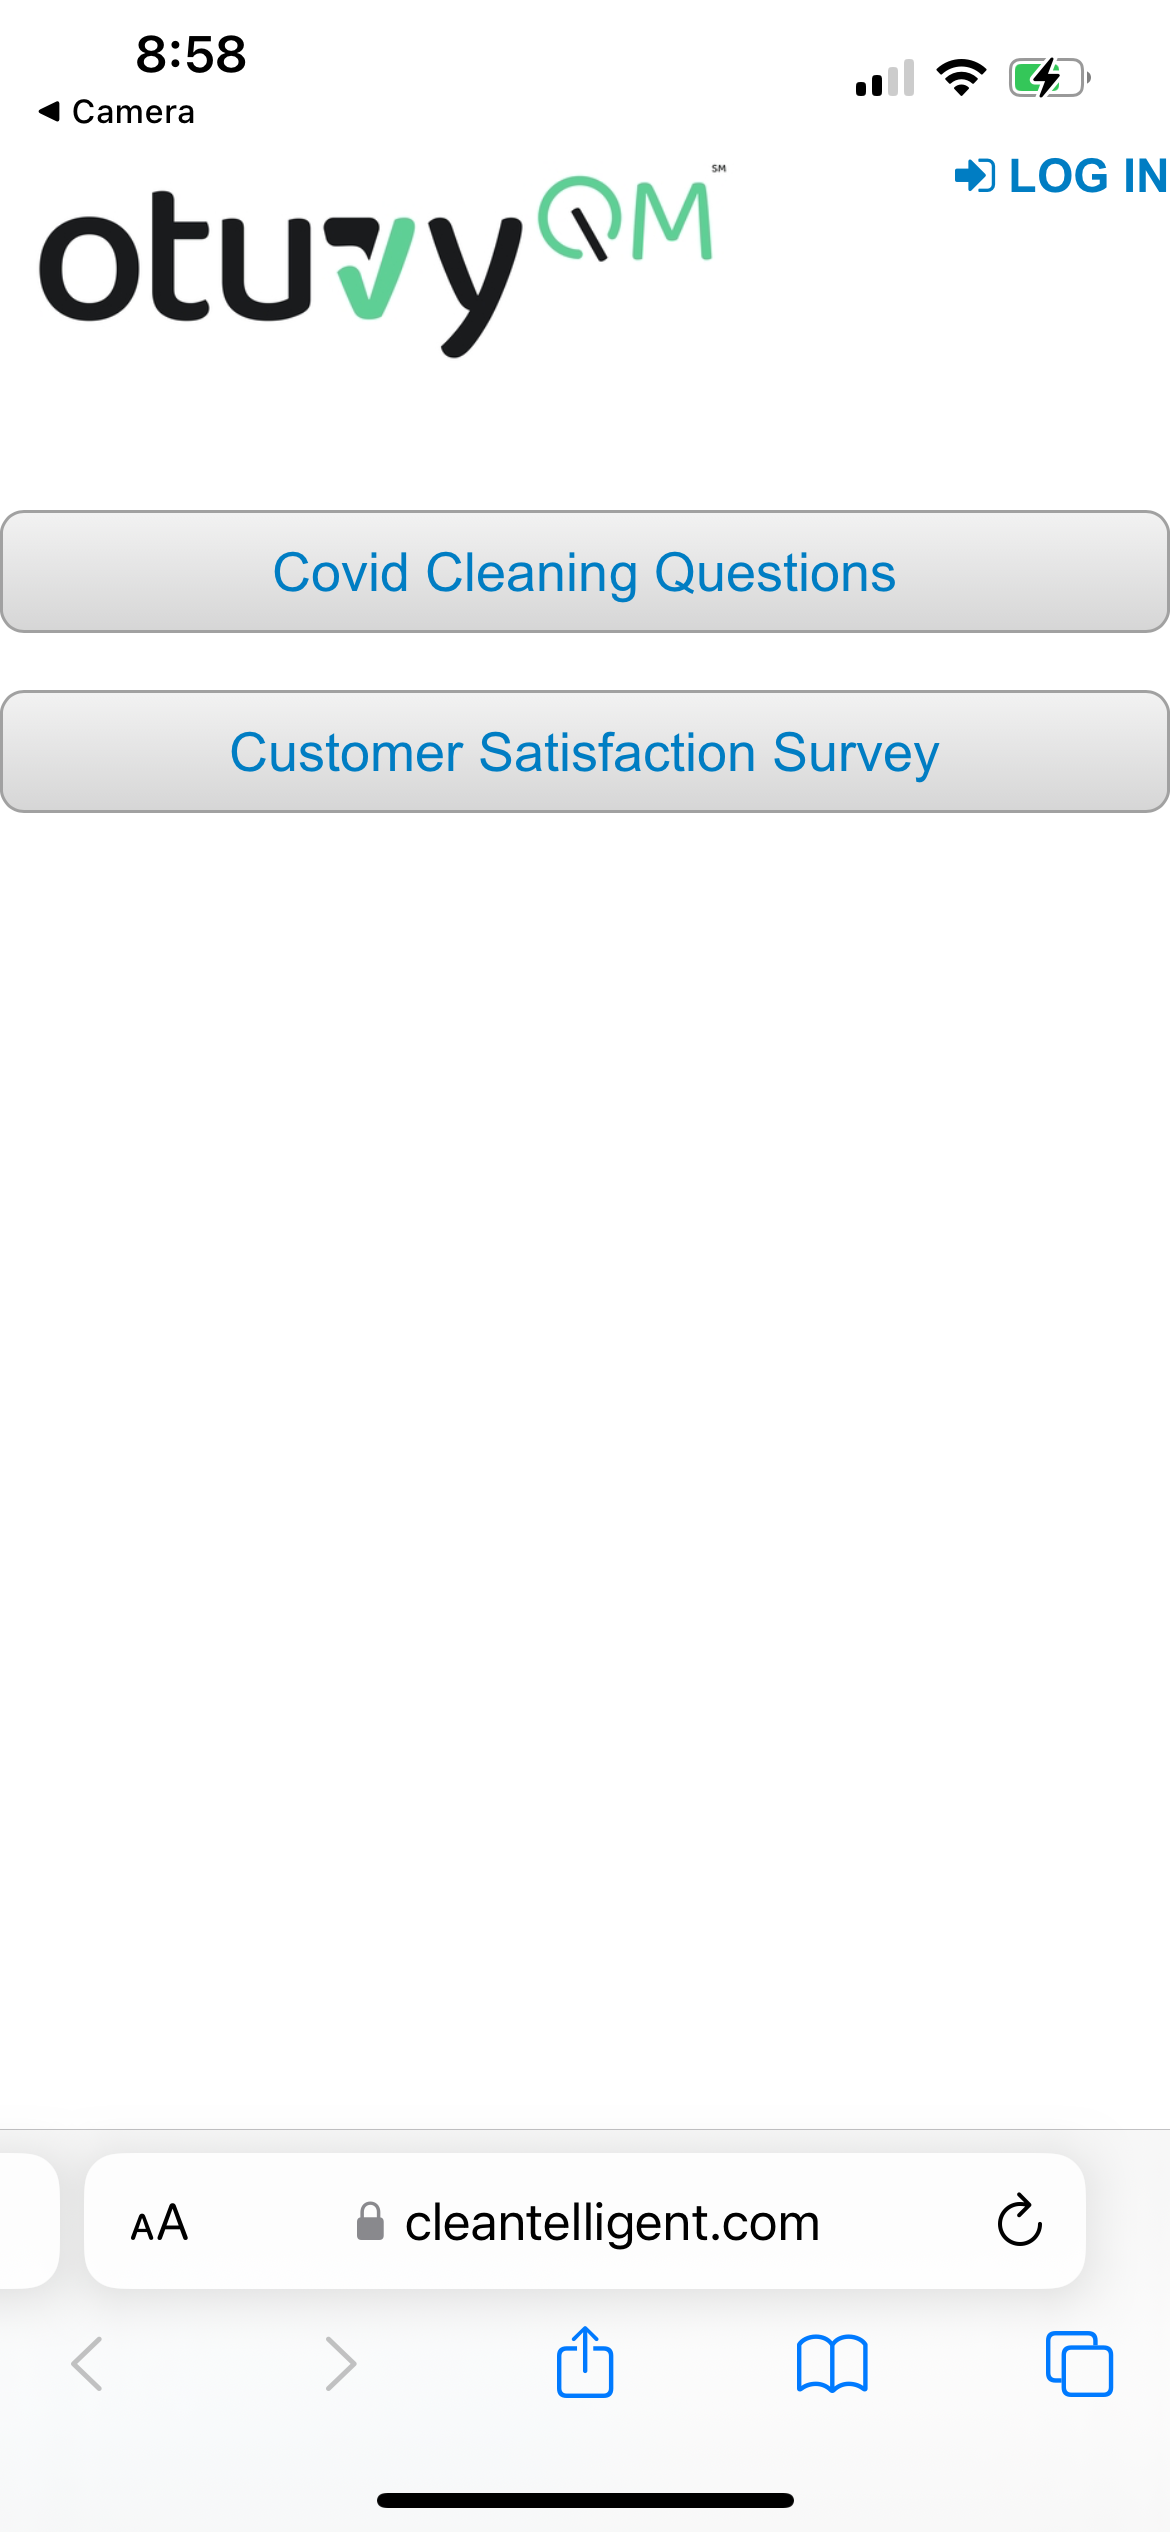
Repeat these steps before assigning **Mobile Survey Templates** since you may include multiple templates per QR code (Service Location, Sublocation, or Section). Each **Mobile Survey Template** will be associated with one of these buttons.
## Assign the Survey
You can assign Mobile Surveys from 3 separate locations:
1. **Custom Question Template Search** page: 
2. **Custom Question Template** review page: 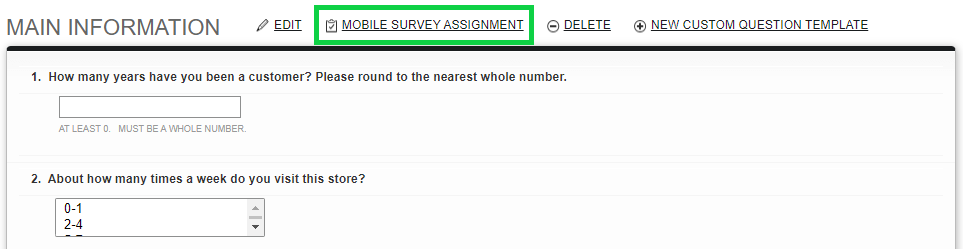
3. **Mobile Survey Templates Search** page: 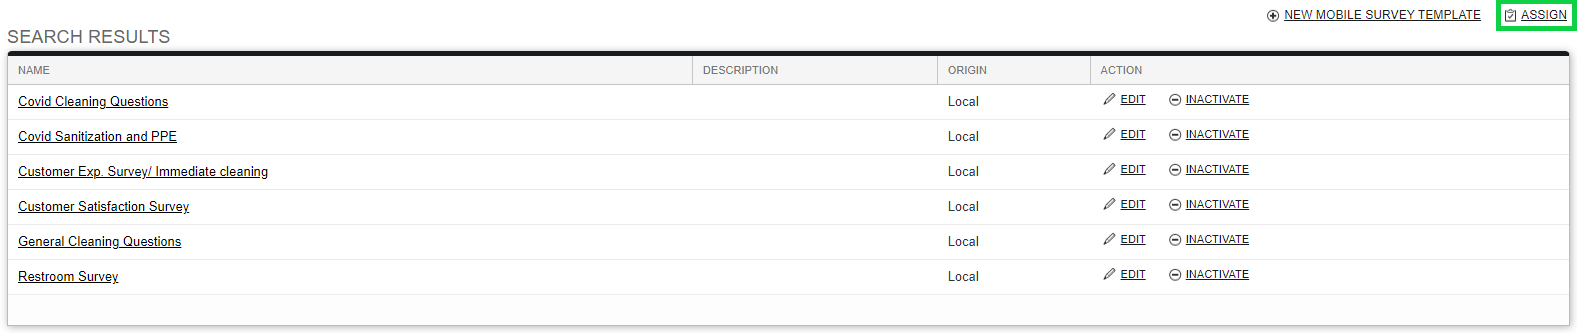
Clicking any of these links will bring you to the Assign Mobile Survey Templates page where you can select from your Mobile Survey Templates or your Custom Question Templates that have been set to viewed under mobile surveys and assign them to various Service Locations, Sublocations, and/or Sections. Let’s go over each part of this tool in detail.
Mobile Survey Assignment Tool
### Mobile Surveys vs Custom Questions
There are 2 types of templates that can be used when assigning mobile surveys. Mobile Survey templates, which combine multiple custom question templates together, and Custom Question Templates, which are the easier and more common method for creating and assigning mobile surveys. We recommend using custom question templates because the tool will still allow you to assign multiple custom question templates at the same time without having to take the extra step of creating a mobile survey template.
### Template Selection Panel
On the left side of the assignment tool is the template selection panel. This panel is searchable and has a toggle at the bottom which will show you either the Mobile Survey Templates or the Custom Question Templates. By default, when you first load the page, Mobile Survey is selected. You can tell it is selected by the title at the top of the panel and by the dark blue tab at the bottom.
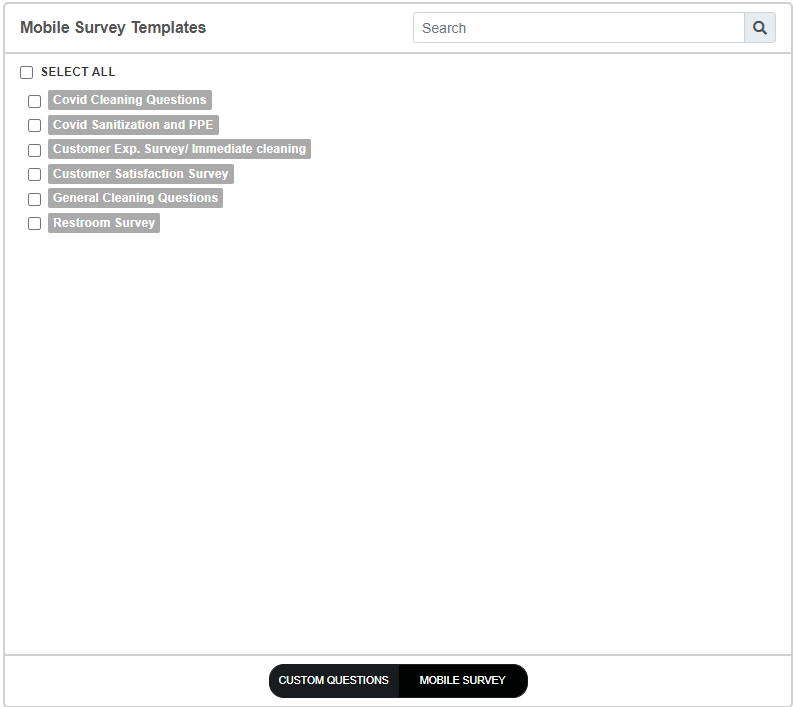
If you didn’t set up your custom question templates into a mobile survey template, you will want to click the light blue tab at the bottom to show the Custom Question Templates instead.
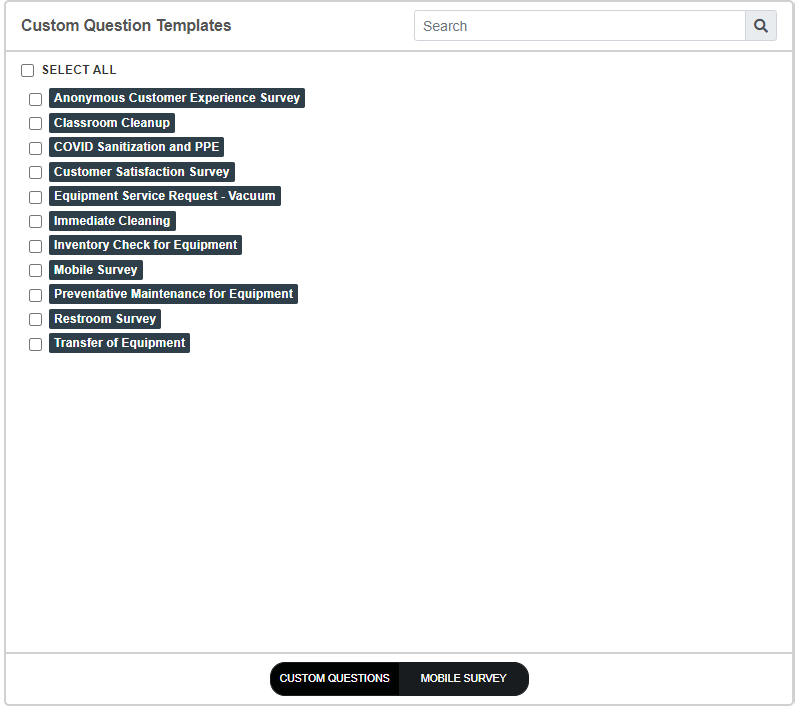
In either case, click the checkbox for the mobile survey template(s) or custom question template(s) you want to assign from this panel.
### Service Location Selection Panel
On the right side of the assignment tool, you will see a list of all of your service locations. Those that have sublocation templates assigned will have a little arrow next to their checkbox. If you click this arrow, you will see any sublocations associated with the location. If any of the sublocations have sections assigned to them, there will be the same little arrow next to their checkbox that you can use to expand and see the sections. At each level, if you see a number next to the name of the Service Location, Sublocation, or Section then that means there are already mobile surveys assigned there. Expanding to that service location, sublocation, or section will show which surveys have already been assigned.
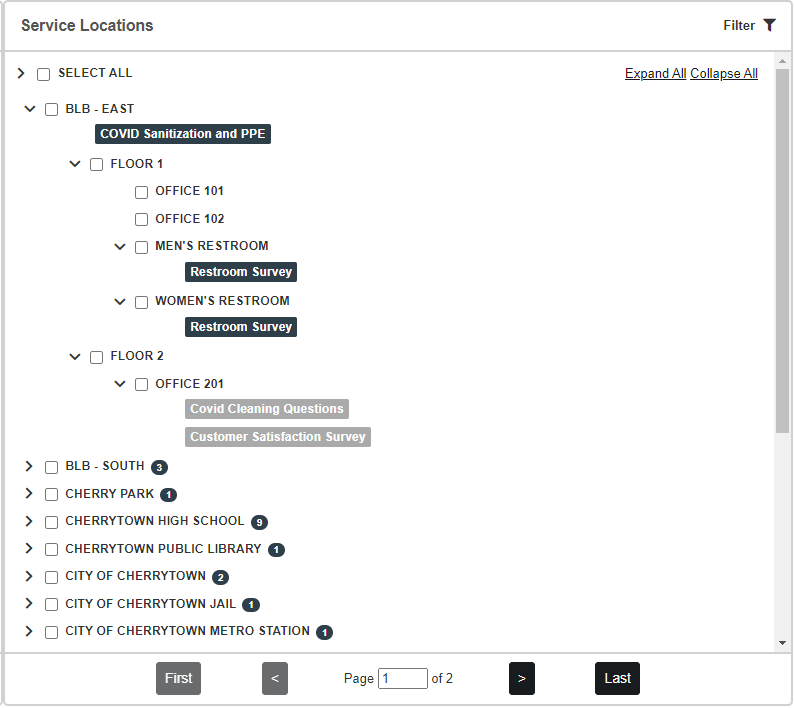
Once you’ve found the correct service location, sublocation, or section you want to assign the mobile survey to, click the checkbox next to it. You can select multiple service locations, sublocations, and sections at a time. For instance, if you wanted to assign a cleanliness survey to all lobbies, restrooms, and other public areas, you could go into the service location and select all the appropriate sublocations or sections before proceeding.
### Filtering the Service Location Selection Panel
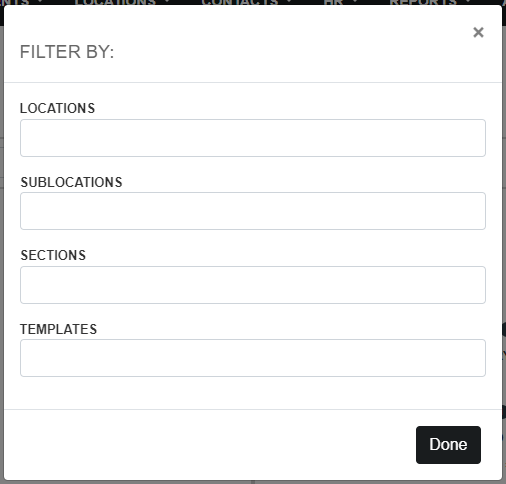
Sometimes, showing all the service locations can be a bit crowded and makes it easy to get lost in the tool. That’s why we have a Filter button at the top of this panel. When you click on this button, a prompt window pops up where you can filter by locations, sublocations, sections, and templates.
### Assigning the Template
Once you have your mobile survey(s) or custom question(s) selected on the left and the service location(s), sublocations, and sections selected on the right, you are ready to click the large Assign button at the bottom of the tool. Doing this will automatically save your changes.

### Unassigning Templates
Whether you are no longer using a specific sublocation template, or if you assigned it to the wrong service location, sublocation, or section, you will want to unassign it so it doesn’t show up when you scan that QR code. To do this, simply use the Unassign toggle at the bottom. This will allow you to select which templates you want to unassign and from where.

Once you do this, the Assign button will switch to an Unassign button and the left panel will be grayed out. Simply navigate through the right panel to the appropriate service location, sublocation, or section and select the template(s) you want to unassign.
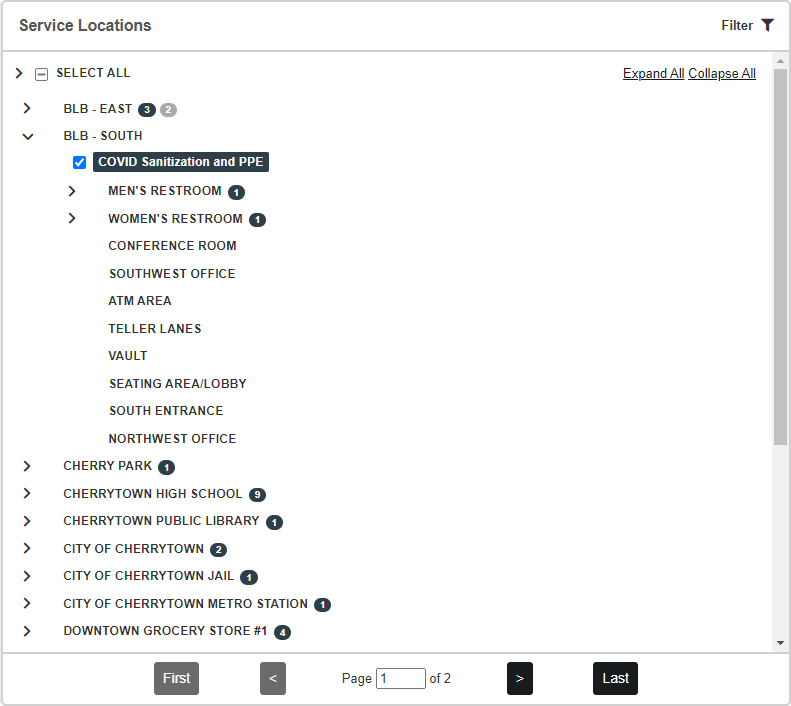
Then Click the big Unassign button at the bottom. Doing this will save your changes.

## Generate the QR Code
Once you have assigned the template, you will need to generate the Quick Response code, QR code for short.
1. Click on the **Reports** tab
2. Scroll to the bottom of the page.
3. In the Other section, click on **Quick Response Codes**
4. Choose an **Output Type** of either **PDF** or **PNG**
5. Chose the **Size** you want each QR Code in pixels (the aspect ratio is locked to 1:1 so the images will be square)
6. Leave the **Type** set to **Service Locations**
7. Select your **Report Criteria** to chose which Service Locations, Sublocations, and Sections to include
8. Click **View Report**
For internal use we find that the **PDF** format is easiest, you can have your employees take the codes while they go around the service locations and scan where they are really easy.
For use on flyers, posters, or marketing materials, we recommend using the **PNG** format since it is easiest to add into another document for use in printing.
Once you have printed out the QR codes you simply scan them with a smartphone and the mobile survey questions will load.
## Generate Work Orders from Mobile Surveys
There are 2 ways you can generate Work Orders from your Mobile Survey submissions:
1. Manually (One at a time)
2. Automatically (all mobile surveys through system-wide configuration)
Let's take a look at both possibilities
### Manually Generate Work Orders from Mobile Surveys
If your account has not set the system-wide configuration to generate Work Orders from Mobile Surveys you can still decide to manually generate a work order from a mobile survey submission.
1. Navigate to the **Service Location Record** where the mobile survey was submitted
2. Scroll to the **Surveys** section of the page
3. Find the mobile survey submission under **Mobile Surveys** 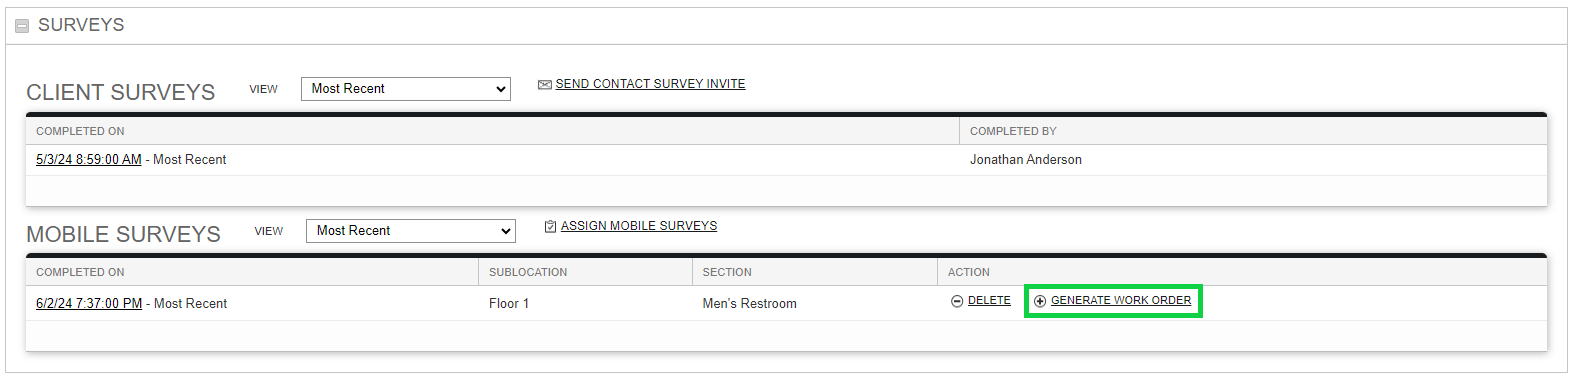
4. Review submission details by clicking on the timestamp for each mobile survey
5. Expand which submissions show by changing the **View** dropdown from **Most Recent** to **All**
6. **Most Recent** only shows the latest mobile survey submission for that location
7. **All** shows all the mobile survey submissions for that location
8. Click **Generate Work Order**
9. If the **Generate Work Order** link isn't present, this means a work order was already generated for this mobile survey submission
### Automatically Generate Work Orders from Mobile Surveys
This is a system-wide setting and will generate work orders from ***ALL*** mobile surveys regardless of what Client, Service Location, Sublocation, or Section they are tied to.
To edit this configuration:
1. Hover over the **Admin** tab and click **SP Info** 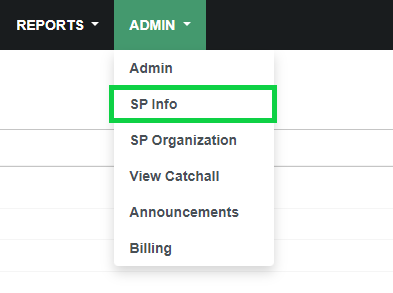
2. Click **Edit** next to **Main Information**
3. Scroll down to the **Work Orders** section of the page
4. Set the **Mobile Surveys Generate Work Orders** dropdown 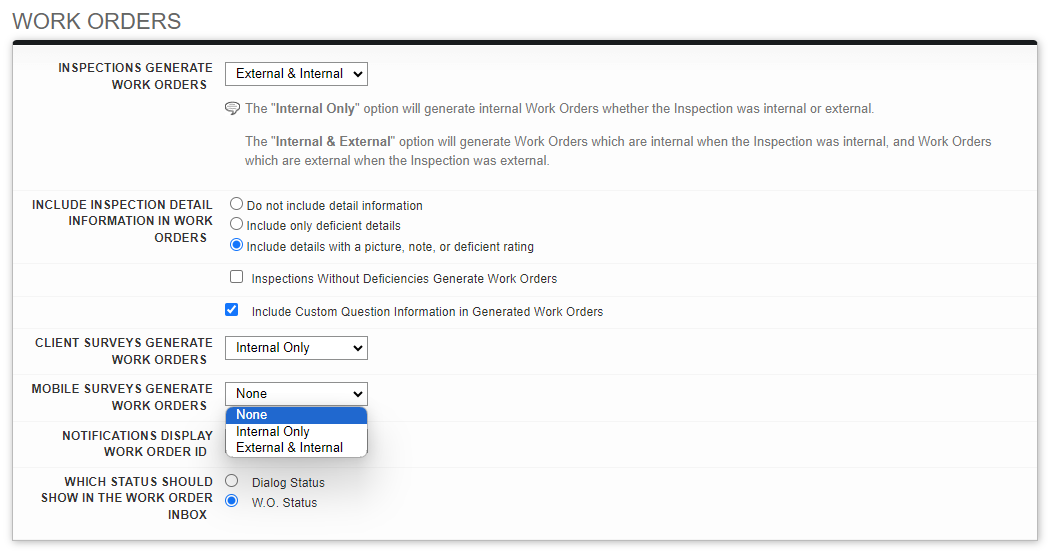
5. **None:** No Work Orders will be automatically generated from Mobile Surveys
6. **Internal Only:** Always generate Internal Work Orders for all Mobile Surveys
7. Internal Work Orders are viewable only by Employee Users
8. **External & Internal:** Always generate work orders for all Mobile Surveys
9. If the **Custom Question Template** uses the **Internal** property, the work orders generated will be internal work orders. 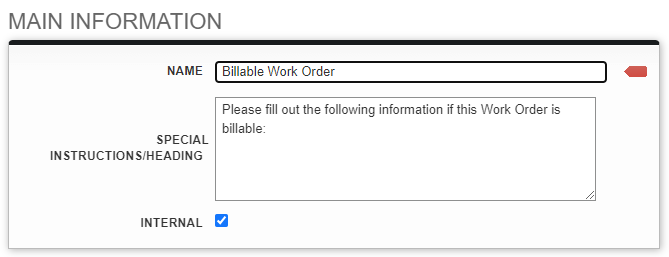
10. Click **Save**
- [Otuvy QM - Getting Started](https://help.otuvy.com/kb/otuvy-qm-getting-started?hsLang=en)
- [Otuvy QM - Setup & Administration](https://help.otuvy.com/kb/otuvy-qm-setup-administration?hsLang=en)
- [Otuvy QM - Contact Access](https://help.otuvy.com/kb/otuvy-qm-contact-access?hsLang=en)
- [Otuvy QM - Inspections](https://help.otuvy.com/kb/otuvy-qm-inspections?hsLang=en)
- [Otuvy QM - Work Orders](https://help.otuvy.com/kb/otuvy-qm-work-orders?hsLang=en)
- [Otuvy QM - Mobile App](https://help.otuvy.com/kb/otuvy-qm-mobile-app?hsLang=en)
- [Otuvy QM - Reports & Dashboards](https://help.otuvy.com/kb/otuvy-qm-reports-dashboards?hsLang=en)
- [Otuvy QM - Advanced Features](https://help.otuvy.com/kb/otuvy-qm-advanced-features?hsLang=en)
- [Otuvy Frontline](https://help.otuvy.com/kb/otuvy-frontline?hsLang=en#main-content)
- [Getting Started](https://help.otuvy.com/kb/otuvy-frontline?hsLang=en#getting-started)
- [Mobile App](https://help.otuvy.com/kb/otuvy-frontline?hsLang=en#mobile-app)
- [Admin Portal](https://help.otuvy.com/kb/otuvy-frontline?hsLang=en#admin-portal)
- [Uncategorized](https://help.otuvy.com/kb/uncategorized?hsLang=en)
[](https://www.otuvy.com/)
[mailto:email@email.com](mailto:email@email.com)
Copyright © 2026, Otuvy, Inc.